P02: Non-Profit Website Makeover

Overview

Teams of three to four students will research and discover the website of a local* non-profit organization and proceed to design and develop a new or improved web presence using WordPress.

Teams will be assembled so that each is composed of individuals with strengths in visual design, copywriting, and coding, though all team members will be expected to work on all tasks to some degree. Task delegation, mutual accountability, and collaborative code & content development are integral components to this assignment. Students will be asked to fill out a Strengths Identifier form to assist the instructor in assembling teams.

The project will proceed through the first three phases of the Web Design process: Discovery, Design and Development. Teams will provide the below described deliverables at the end of each phase. Each phase feeds into the next: 1. “Discover” all you can about your client and their messaging; 2. “Design” strategies for information architecture and visual thinking based on findings from the Discovery phase; then 3. “Develop” those ideas into a WordPress site. (Note that Phase 4: Deployment is beyond the scope of this project.)

Teams will meet with the instructor several times throughout the project at the end of each deliverable phase.

Teams may optionally choose to contact representatives from their chosen organization to gain additional insights and strategies.

Technical Requirements

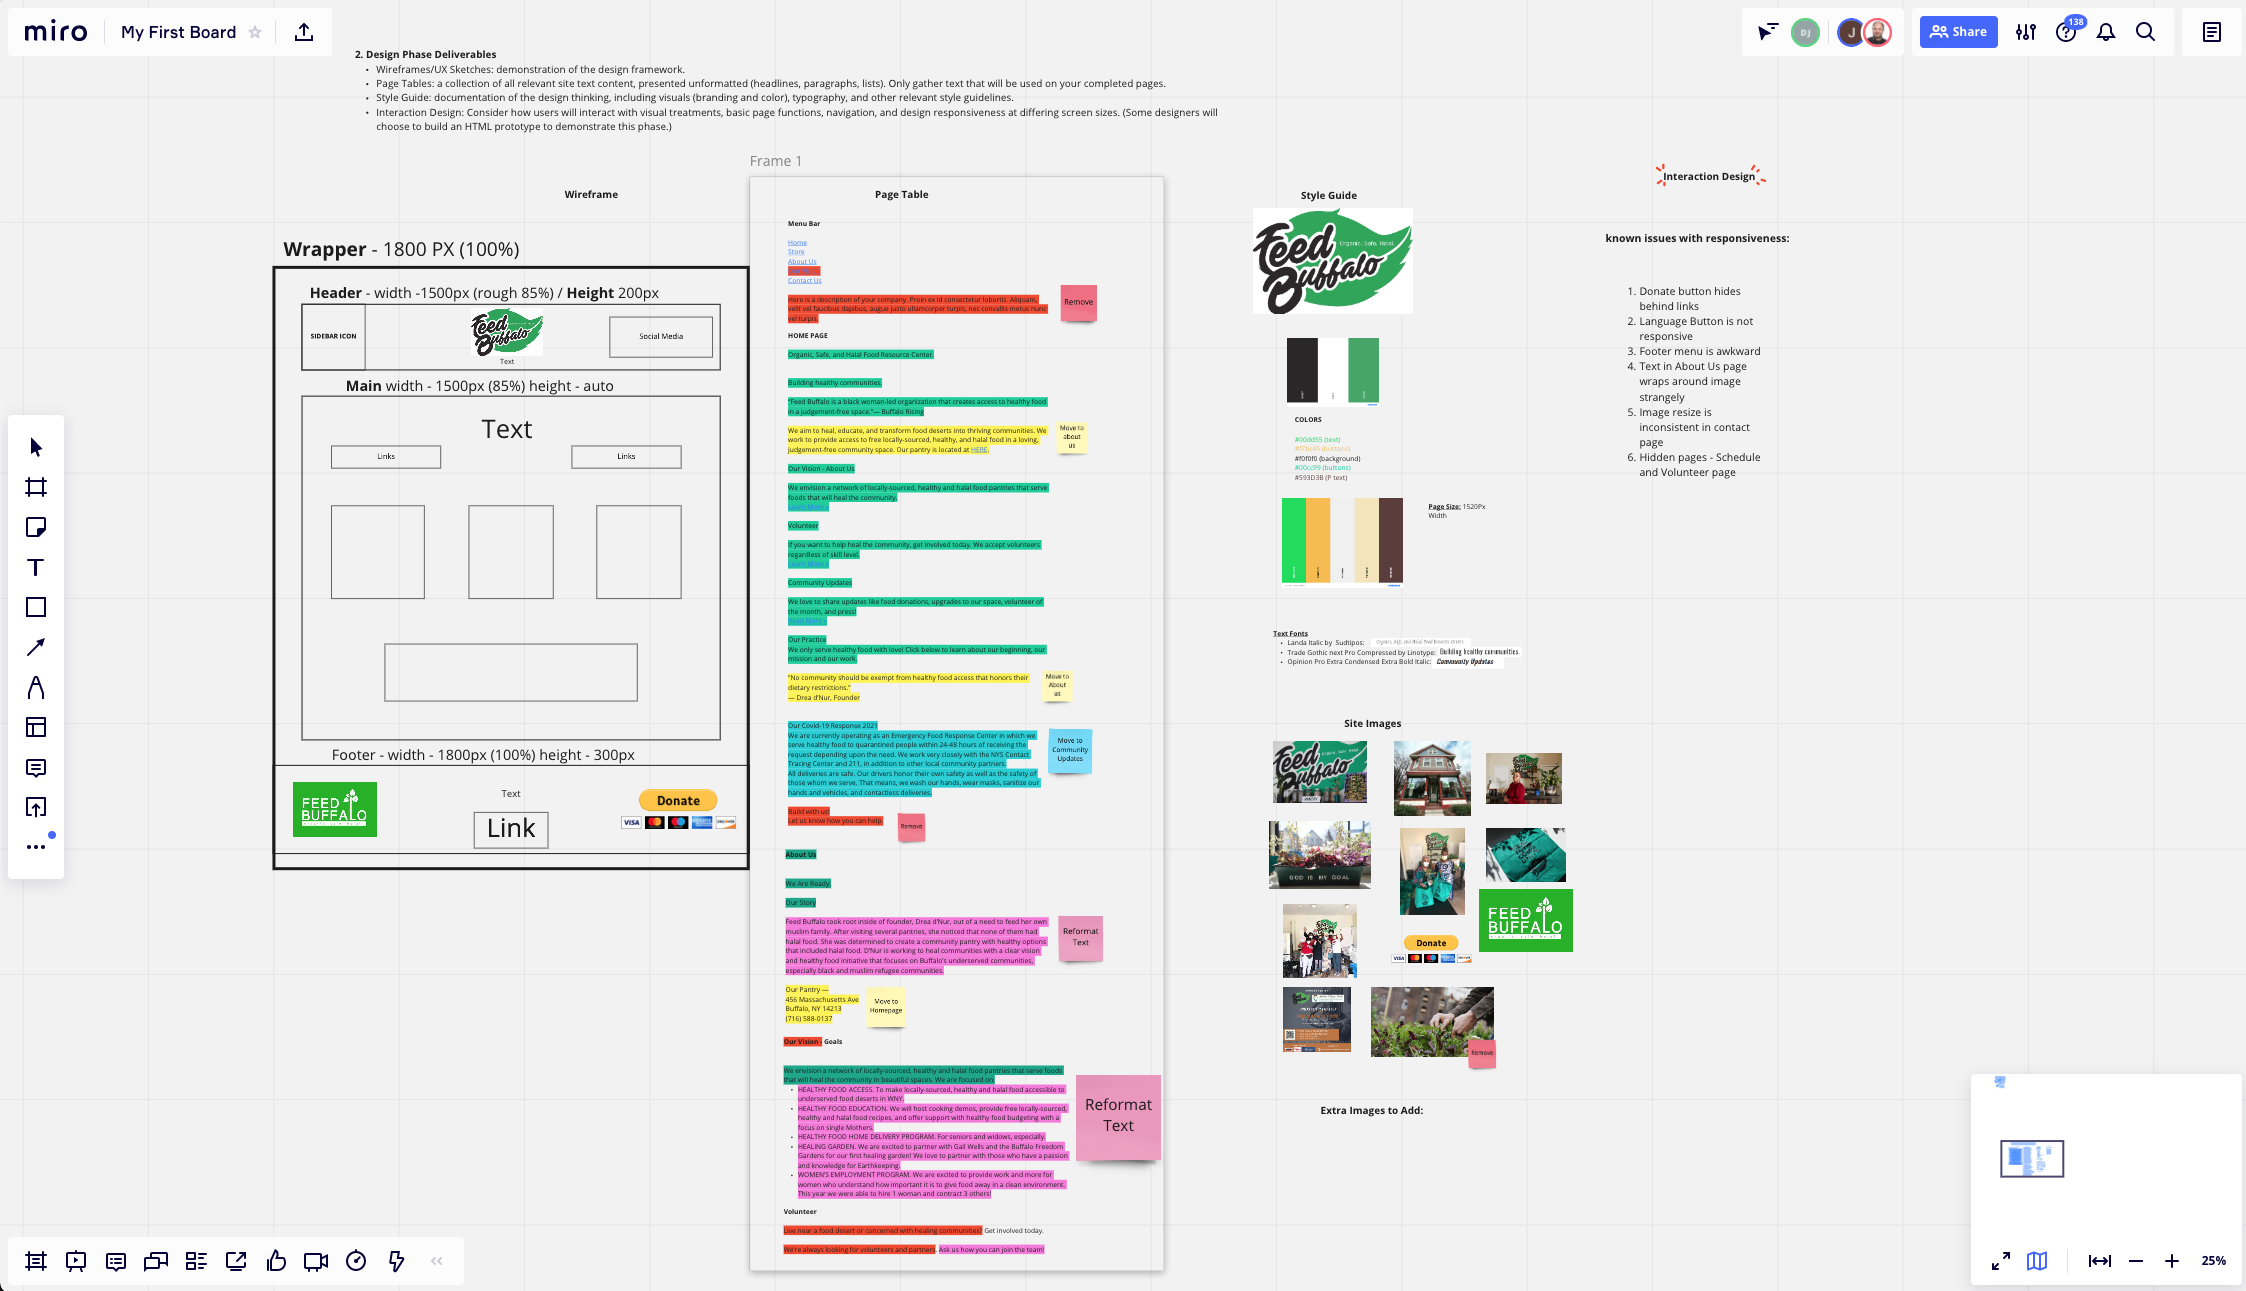
  • Develop a site by choosing an appropriate theme from WordPress.org, modifying CSS as necessary (child theme or “additional CSS” method), and adding content.
    • All links must be functional, even if they lead to placeholder pages.
    • There must be no missing or broken images.
    • Images must be optimized for the Web — properly sized (pixel dimensions) and compressed (jpg, gif or png.)
    • Social interactive features, like commerce, donation links and so on do not need to be functional. Placeholder buttons or images can be used.
  • Refer to Exercises 1–5 for technical guidance, and any other resources necessary.

Design Considerations

  • In addition to technical construction and WordPress functionality, consideration should be given to overall design quality. Visual coherence, typography, graphic treatments, color palette, and information architecture will be evaluated as part of your grade.
  • Use typography principles in a thoughtful and appropriate manner.
  • Responsive: Design must respond well at all screen sizes.

Deliverable Requirements

The below deliverables will be presented by each team during consultation meetings at the end of each phase. Documents should be neatly and professionally prepared and presented. A single PDF or slide deck (Google Slides/PowerPoint/Keynote) combining the deliverables for each phase is strongly preferred for deliverables consultations, and required for the final deliverables package. Figma, Sketch, Illustrator, Infinity Designer, OmniGraffle and other tools should be used to generate site maps, wireframes, and style guides. Hand-drawn sketches are allowable for early phase sketches.

After the completion of Phase 3, deliverables from all three phases will be combined into the final deliverables package. Improvements to prior phase findings and evolution of ideas can be documented and explained.

Each team member is responsible for tracking hours in the team timesheets, found in the class Box folder. (Please edit your timesheets through the Box website opening in Excel Online (UB Credentials needed to login to Office) or install the Box Drive app and edit in Excel on your desktop.)

1. Discovery Phase Deliverables

  • Client IdentificationStatement: Describe in a couple paragraphs or bullet points:
    1. Who is your client? What are their core values and distinguishing features?
    2. Why do they have a website, and what are they trying to achieve?
    3. Who are the expected visitors to their site, and what questions will they have when they come to the site? (You are encouraged to develop two or more personas to assist with asking and answering these questions.)
  • Current Site Map: Use the current site navigation items to create a visual (flow chart) or written (outline) map of the current site structure, demonstrating existing information architecture.
  • Proposed Site Map: Propose a new visual (flow chart) or written (outline) map demonstrating how you will approach information architecture, showing how content will be reorganized across pages throughout the site.
  • Best-Practice/Similar Site Comparisons: Find and examine three or more websites of similar organizations that demonstrate best practices and inspire you to think about potential designs. Include screenshots and some bullet points noting what makes the site a best-case example.
  • Strategy Statement: Considering the discovery findings listed above, propose a design strategy that will convey the organization’s core values and meet communication goals. This strategy should provide guidance as you move into the next (Design) phase.
    The statement should not be a generalized list of things that need fixing, but specific examples of how the design choices you make will better communicate your client’s values and identity, and amplify their message to site visitors.

2. Design Phase Deliverables

  • Wireframes/UX Sketches: demonstration of the design framework. In Project 1, wireframes were used as a blueprint to build your HTML/CSS. Since you’ll be chasing a prebuilt WordPress theme for Project 2, this wireframing should be a way for you to identify basic needs for content areas and functional components, which will help you identify an appropriate theme.
  • Page Tables: a collection of all original site text content, presented unformatted (headlines, paragraphs, lists). This will be edited, condensed and rearranged as part of the Develop process. (You do not need to include this in the final deliverables pdf, as below.)
  • Style Guide: documentation of the design thinking, including visuals (branding and color), typography, and other relevant style guidelines.
  • Interaction/Usability Design Guide: Briefly describe how usability will be addressed by design choices: ease of navigation, responsiveness, accessibility… Consider how users will interact with visual treatments, basic page functions, navigation, and design responsiveness at differing screen sizes. (Can be included as part of the style guide or as notes appearing on your wireframe.)

    Note that some designers will choose to build an HTML prototype to demonstrate this phase. This would overlap into with Phase 3 Develop and is an optional but not-expected part of Phase 2 deliverables.

3. Develop Phase Deliverables

  • Install WordPress in one sandbox in the account of one team member.
  • Research and choose an appropriate WordPress Theme best suited to your identified Design Phase, following tech guidelines above. Your theme choice should accommodate the wireframing and design decisions reached in Phase 2. It should allow for extensive customization from the WordPress dashboard>Appearance>Themes>Customize. Ideally it will accommodate the “Additional CSS” function so that you can create or overwrite default rules. If it does not allow for customization, consider creating a child them of it, referring to Exercise 5.
    Note: Avoid using the “Twenty-” annually named themes developed by WordPress. They are meant to showcase new WP version features, but are usually not the best choice for customized design.
  • Be prepared to discuss how you are customizing your theme.
  • A sufficient number of functional pages should be presented at the end of this phase to convey the main goals of the redesign.
    • You may use placeholder/empty pages or boilerplate content, with appropriate menu nav links, as necessary.
  • Post your Project 2 Pantheon URL to the appropriate thread in Discord.

4. Final Deliverables

  • Final Site—Working WordPress site containing all requirements as listed above.
  • Final Project Guide—a single, well organized and designed PDF, 8.5×11″ pages. Graphics should be of a legible size with proper resolution. Type style and colors within the PDF’s design should pair with your site design.

    The Final Project Guide summarizes the design process and guides your client’s future content creation and social media integration. It must include:
    1. Title page should include the name of the client organization, old and new web URL’s, and the name of each team member.
    2. Major findings from the Discovery Phase and how those led to your design solution. Include what you presented during Phase 1 Deliverables consultation, clean up as needed.
    3. A screenshot from each of the Best-Practice/Similar Site Comparisons from your initial research.
    4. Proposed Site map demonstrating chosen information architecture, and wireframes demonstrating user interface and page composition.
    5. Finalized style guide, including color palette, typography samples, and examples of other visual treatments.
    6. WordPress Theme: Present the name of the theme you chose, with credit to the developer. Discuss how you modified or altered the theme using a child theme, by adding CSS, working within the theme’s own customization options, etc…
    7. Screenshots of major pages of the new site at representative desktop, tablet and phone sizes to demonstrate responsiveness and usability. Also include representative screenshots of the organization’s current website for comparison.
    8. Training to assist client with maintaining and updating site. For this project, only a brief summary of instructions is needed, explaining how a client (who will have no knowledge of HTML/CSS) will maintain the site and add/edit content.
      • Login
      • Create and edit pages
      • Create and edit posts if used and how a post differs from a page
      • Style and formatting options
      • How and when to add media
  • Optional: 3-Minute Video capture demonstrating site functionality.
  • To ensure professional presentations, all final deliverables should be proofread and edited for spelling and grammar.

Final Project Guides — Student Examples

Below are examples of professionally presented final project guides. Reviewing each guide should give you a clear picture of why the team chose their client, what they discovered about the client, and how the proceeded through each phase of the project. In the mist successful examples, the PDF are professionally prepared and neatly designed, often reflecting the identity style of their improved site designs.

Process Tips

  • Immediately connect with your team members and establish communication protocols. Channels have been created for you in Discord for messaging with your team and the instructor.
  • Select a client that you all share an interest in. Post your clients URL to the Project 2 channel in Discord. It must be unique — if another team has named it already, choose another.
  • Some students have successfully used Miro.com for collaboration, brainstorming, and collecting assets.
    Project 2 Miro Board collaboration
  • One student will setup a Pantheon sandbox and install a WordPress environment. That student can create a Pantheon Team so that others can connect to the sandbox via SFTP to collaborate on Theme files. From the sandbox dashboard, click on the Team link in the upper right. The owner can then add others by their UB Email addresses. The added users will then see that sandbox in their own dashboards.
  • The student who sets up the WordPress environment can then create user accounts for each team member in the WordPress dashboard. Everyone can be given the “Administrator” role for fun access to the dashboard and content.
  • Each team member will maintain a rough time log of project related activity so that each member can contribute an equitable amount of work. A time log will also reveal a realistic amount of time to complete each phase, and, in the commercial world, provide justification for billable hours.
    • Time Sheets are accessible through buffalo.box.com. A link will be provided. Either install Box Edit app or edit the document online with Microsoft 365 (free, using your UB credentials). DO NOT DOWNLOAD, EDIT and UPLOAD the timesheet. You could inadvertently destroy another team member’s additions.
  • Deliverables will be collected at the consultations following the completion of each phase, and then included as part of the Final Project Guide.
  • Good Deliverables Presentations should be well organized and every member of the team should have a role in presenting content.
  • Grades will be assigned to each student based on overall project results and on individual contributions.

Work-In-Progress Critique Guidelines

  • WordPress Site will be displayed from Pantheon. Upload your site URL to the designated thread in the class Discord channel.
  • Design fundamentals and theme customizations must be in place — layout, color, typography, other visual treatments.
  • Your chosen theme should be fully responsive.
  • All Pages should be present in the menu, but do not necessarily need to be populated with final content. Enough pages should be populated and formatted to demonstrate major site architecture and functionality.
  • Be prepared to describe your client and your Phase 1 findings, how that guided wireframe and IA development, and ultimately the design solution.

Final Grade Considerations

Time Sheets

  • Evenly Distributed Workload
  • Adequate Time Investment

Professional Conduct

  • Well prepared for each consultation meeting
  • Present and on time
  • Clean and organized presentation materials
  • Each team member contributes to the meeting

New Site

  • All requirements as listed above.
  • Information architecture/navigability
  • Visual design
  • Responsive
  • Technical performance

Final Project Guide

  • Professional presentation
  • Proofread—no typos, correct spelling & grammar
  • Visual design: Clean, well organized, consistent typography, legible graphics, screenshots
  • Each phase is presented—discovery, design, develop
  • Training summary